How to Attach your Paddleboard Fin
Attaching Your Paddleboard Fin with a US (Universal Standard) Fin System
Equipping your paddleboard with a fin is a breeze! This guide will walk you through attaching a fin using a US fin system, which is a common setup on many boards. We’ll focus on fins that use a thumbscrew for easy attachment, but also discuss options for screw-on fins.
Understanding the Fin Hardware
There are two main hardware components for attaching your US fin:
- Washer: This small, flat piece typically made of metal helps distribute pressure from the screw and creates a secure connection.
- Thumbscrew (or Screw): Most modern US fins come with a thumbscrew that allows for finger-tightening. Some older models might require a screwdriver and a regular screw.
Step-by-Step Instructions: Attaching the Fin
-
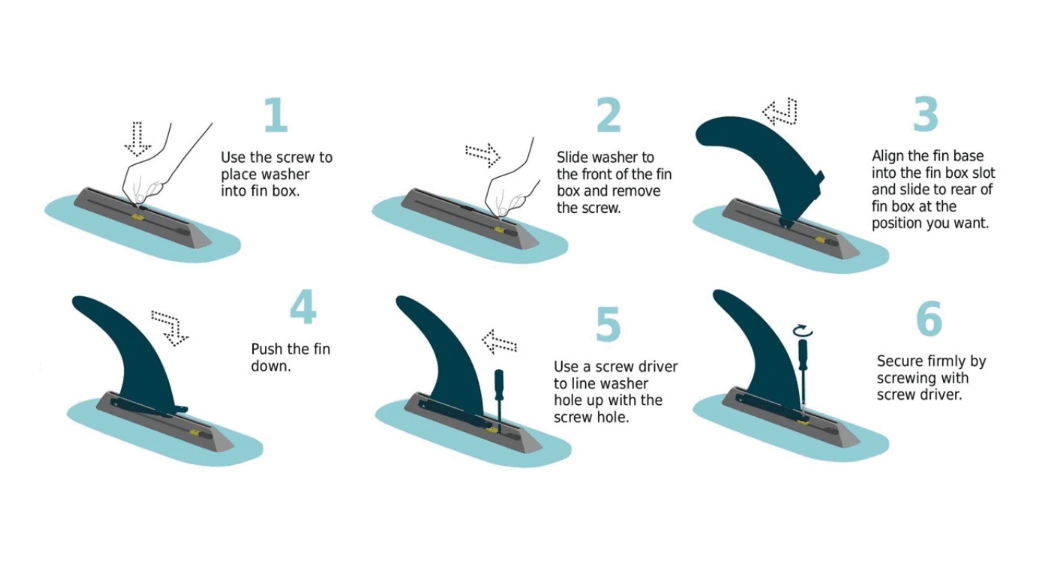
Prep the Fin Box: Locate the fin box at the rear center of your paddleboard. It will likely have a rectangular opening.
-
Insert the Washer: Identify the wider section in the middle of the fin box. Slide the washer into this slot and push it towards the front of the board using your thumb or thumbscrew.
-
Slide in the Fin: Carefully examine the base of your fin. You’ll see a small guiding tab that inserts first. Align the tab with the center of the fin box opening and slide the fin back until it’s fully inserted. Depending on your fin, you might need to press down firmly to secure it in place.
-
Tighten the Connection: Pick up your thumbscrew and position it so the washer sits directly beneath the front opening of the fin, aligning the holes. Screw the thumbscrew down snugly until the fin feels secure.
Using a Screwdriver (if applicable): If your fin uses a screw instead of a thumbscrew, you’ll need a screwdriver to tighten it. Follow the same steps as above, but use the screwdriver to tighten the screw securely.
Pro Tips:
- Apply a small amount of marine lubricant to the fin box before inserting the fin for easier installation and removal.
- Avoid over-tightening the screw or thumbscrew. You want it to be secure, but not so tight that it damages the fin or board.
- When not in use, remove your fins to prevent damage or injury.
- If you plan on using pliers to tighten a thumbscrew for long-term fin attachment, do so cautiously to avoid stripping the threads.

Fin Placement Within the Fin Box
The position of your fin within the fin box can affect how your board handles. Here’s a general guideline:
- Center Position: Placing the fin in the middle of the fin box offers a good balance of tracking (going straight) and maneuverability (turning). This is a good all-around choice for most paddling conditions.
- Forward Position: Sliding the fin towards the front of the fin box will make your board turn easier. This can be helpful for maneuvering in tight spaces or choppy waters.
- Back Position: Placing the fin further back in the fin box will improve the board’s tracking ability. This can be beneficial for long, straight-line paddling on calm water.
Removing Your Fin
- Unscrew the Thumbscrew (or Screw): Loosen the thumbscrew completely, or remove the screw using a screwdriver if applicable.
- Pop Out the Fin: Gently pull up on the fin until it pops out.
- Slide Out the Fin: Once one side is free, slide the fin towards the opening and remove it completely.
- Remove the Washer: Use the thumbscrew to nudge the washer out from the front of the fin box.
Storing the Hardware: It’s a good idea to keep the washer and thumbscrew (or screw) attached to the fin when not in use. This helps prevent losing these small parts.
By following these steps, you’ll have your US fin system attached and ready to hit the water in no time!

